


Adobe After Effects is a leading tool for video motion graphics and post-production, but it lacks built-in auto-captioning capabilities.
Unlike Adobe Premiere Pro, it requires manual captioning, plugins, or external tools to generate and synchronize subtitles effectively.
This guide will show you the best ways to add subtitles to your After Effects projects.
Adobe After Effects does not have a built-in auto-captioning feature like some other video editing software. Unlike Adobe Premiere Pro, which offers an automatic speech-to-text captioning tool, After Effects requires manual input or external plugins to generate subtitles.
To add captions in After Effects, you must create text layers manually or use third-party scripts and plugins to streamline the process.
If you're working in After Effects and want to add subtitles, the manual method doesn’t require any plugins, and it gives you full creative control.
Let’s walk through the process step by step.

First, open your After Effects project and make sure your video is already added to the Composition panel. Then select the Text Tool (T) from the top toolbar. Click anywhere in the video preview to create a new text layer and type your first subtitle line.
Position the subtitle at the bottom center of the screen — that’s the most common and readable spot. Use the Character panel to adjust your font, size, and color. Go for high contrast — white text with a black shadow or background box usually works best on most videos.
Now it’s time to sync that text with your audio.
Drag the subtitle text layer along the timeline so it starts exactly where the line of dialogue begins. Adjust its length so it disappears just after the speaker finishes. Then, to add the next subtitle, simply duplicate the text layer using Ctrl+D (Windows) or Cmd+D (Mac). Update the text and move it to the next time slot.
Repeat this process for the rest of your video. It takes time, but the control you get over timing and placement is unmatched.

Once you’ve added all your subtitles and animations, it’s time to review the full video.
Play it back inside the Composition panel. Watch for any typos, off-timing, or visual issues. Make sure the text doesn’t overlap with other on-screen elements. Adjust spacing or timing where needed.
When everything looks good, go to File > Export > Add to Render Queue, or use Adobe Media Encoder for more export options. Choose your preferred format and settings, and render the final video.
Your subtitles are now burned directly into the video, making them visible on all platforms — no need to upload separate files.
Static subtitles are fine, but adding a bit of animation can really elevate the look.
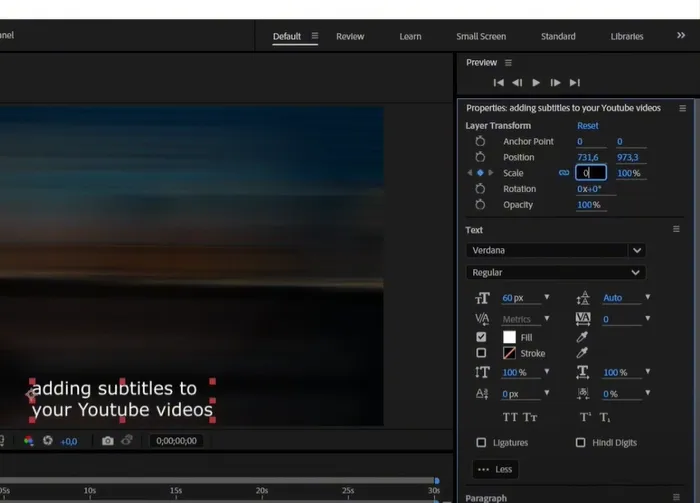
One easy option is a fade-in/fade-out effect using scale or opacity. Select a subtitle text layer, go to the Transform properties, and add keyframes for Scale or Opacity.
Start with 0% scale or 0% opacity at the beginning, increase to 100% after a few frames, and then return to 0% near the end. This creates a smooth appearance and disappearance effect. You can copy and paste these keyframes to other subtitle layers for a consistent look.
It’s a simple trick, but it adds polish.
When everything looks good, go to File > Export > Add to Render Queue, or use Adobe Media Encoder for more export options. Choose your preferred format and settings, and render the final video.
If you’ve tried adding subtitles manually in After Effects, you already know — it can get tedious fast. That’s where subtitle plugins come in. They save you time by automating the creation, syncing, and even styling of subtitles. One of the most popular tools for this is AEJuice’s Auto Captions.
Let’s see how to use a plugin to add subtitles in a faster, more efficient way.

To get started, go to the AEJuice website and download their Pack Manager. It’s free, and once installed, you’ll get access to a library of visual tools — including the Auto Captions plugin.
Once installed, open After Effects. From the top menu, go to Window > AEJuice Pack Manager 4. This will launch the AEJuice interface directly inside your After Effects workspace.
Now browse the plugin list and download the Auto Captions Pack. Once it’s installed, pick a subtitle template you like — there are clean, modern, animated styles you can choose from. When ready, click Import > Active Composition.
The plugin will now analyze your audio and automatically generate text layers synced with your video’s speech. Just like that, your timeline is filled with subtitles.
Of course, no auto-caption system is perfect — so the next step is review.
Inside the AEJuice panel, click on the Package icon to open the text editor. Here, you’ll see all your subtitles listed in one place. Click on any line to make changes — whether you’re fixing spelling, improving timing, or rephrasing the text for better readability.
Once edited, go back to your timeline and preview the subtitles in action. Each subtitle is its own editable text layer, so you still get full creative control if you want to tweak spacing or position.
The beauty of AEJuice is that it doesn’t just generate basic subtitles — it makes them look good too.
Each template you import already includes smooth animations, like fade-ins or pop-up effects. But you can also adjust these to match your brand or style. Select any subtitle layer and use the Effects Controls panel to tweak animation speed, text appearance, or entry direction.
Need the text to appear faster? Want it bolder or higher on the screen? You can do that easily without building effects from scratch.
Once you’re happy with the subtitles, it’s time to render.
Just like before, go to File > Export > Add to Render Queue, or use Adobe Media Encoder for more flexibility. Your subtitles will be burned into the video, which is perfect for platforms like Instagram, TikTok, or anywhere closed captions aren’t supported.
For a streamlined and professional workflow, Checksub offers an AI-powered solution for generating, editing, and integrating subtitles in After Effects.


Want to simplify the subtitle creation process in After Effects? Try Checksub for free.


